Tutorial Lesson: Editing and viewing plants
In this lesson you will learn about animating, copying, selecting, randomizing, moving, rotating and resizing plants.
Open the file from the previous lesson
If you haven’t already done the previous tutorial lesson1HZT4>main, open the file called Tutorial Lesson – Making a Plant.pla in your PlantStudio directory. If you already did the previous lesson, open the file you made now if it is not already open. In either case you should see one Black-eyed Susan in the drawing area.
Look at the main window
Let’s take a moment to orient ourselves here in the main window.
1. At the top of the window is the toolbarNavigating_in_the_main_window. We’ll learn more about each item on it as we go through the tutorial.
2. Below the toolbar is the drawing area, where you can see your plant. On the lower left is the plant list, with one item in it (Black-eyed Susan).
[If the drawing area is on the left side instead of the top, you need to re-orient the window. Choose Place Drawing Area > On Top from the Options menu.]
3. The seedling  in front of your plant’s name in the plant list shows you the plant is visible. Click on the seedling; the plant will disappear. Click on the seedling again to show the plant.
4. The little pencil indicator below the plant list tells you whether you have changed the open file  or not
  . Next to the pencil is a little plant icon
  that tells you if you are using plant bitmapsIT406I and how much memory they are taking up. Next to the plant icon, a progress bar
  temporarily appears when PlantStudio is drawing plants.
5. On the lower right side of the window is the focus panel, where you can find information about your plant.
▪ The Arrangement panel shows the plant’s location, size, and x, y and z rotations3MEF02G.
▪ The Parameters panel is where you change plant parameters.
▪ The Age panel shows the plant’s life cycle with a graph of size versus time.
▪ The Posing panel is used to edit individual plant parts.
▪ The Stats panel shows a breakdown of the plant into its parts.
▪ The Note panel shows any recorded note for the plant.
6. Just click on the tabs now to see what is there. We’ll do more with them later.
Select the plant
You only have one plant in your file, so this is a good time to learn about selecting plants.
1. If the Select/drag  cursor mode button is not pushed in on the toolbar at the top of the window, push it in now. Your cursor should look like an arrow in the drawing area.
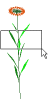
2. Click on your plant. A rectangle should appear around it.

3. That rectangle is called a selection rectangle. You can also see that your plant is selected because it is highlighted in the plant list.
[If you don’t see a selection rectangle, choose Draw Rectangles > Around Selected Plants from the Options menu. If you still don’t see one, choose View What Plants > All Plants from the Options menu.]
4. If you are using plant bitmapsIT406I, you have to click directly on a plant – on a leaf, stem, or other colored surface – to select it. If you are not using plant bitmaps, you just need to click inside the selection rectangle. We don’t know which option you are using, so we’ll just say “click on the plant” or “click off the plant” and you will know what we mean.
[If you don’t know whether or not you are using plant bitmaps, you should find out now, because this choice has a large bearing on how PlantStudio will work on your computer. Glance over the section on using plant bitmapsUsing_plant_bitmaps>second now to see if you should be using them. Unless you have little free memory on your computer, we suggest that you use plant bitmaps.]
5. Now click off the plant. The selection rectangle will disappear.
[If it just turns gray, that’s okay; it just means that the option Draw Rectangles > Around All Plants is turned on in the Options menu.]

6. Also, your plant’s name will no longer be highlighted in the list. Also notice that many of the menu items are now disabled. And look at the focus panel – it is gray and there is no information there. This is all because there is no plant selected.
7. You can also select the plant by clicking and dragging to make a square that includes any part of the plant. Try that now to reselect the plant.
Animate
Now let’s see how the plant looks as it grows.
1. Choose Animate through Life Cycle from the Plant menu. The plant will shrink down to a seedling, then grow up to its full size again. Notice that while the plant is animating, you can’t click anywhere with the mouse. To stop the animation you have to press a key on the keyboard.
2. You can also animate the plant by clicking the Animate  button in the Age panel. If you like, try that now and watch the animation again.
Make two more plants
It’s a lonely little plant, don’t you think? (Reminds me of the song, “I’m a lonely little petunia in an onion patch, and all I do is cry all day.”) Let’s give it some company.
1. Hold down the Control key and click on the plant, then drag a short distance to the right. Now you have an identical clone of your plant sitting next to it.
2. Make another copy in the same way, by Control-dragging.
Select all the plants
1. Click outside the plants and drag across them all to select all the plants.
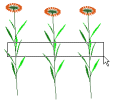
2. Now notice that one plant has a different-colored selection rectangle than the other plants.

3. Also notice that the plant’s name has a highlighted box around it in the plant list. This plant is called the focused plant8IN1RV>second. The focused plant is the plant things happen to when they can only happen to one plant. It’s always the plant you clicked on first, or if you selected a bunch of plants at once, the one first in the plant list.
4. Now click on the tabs in the focus panel again. Notice that in the Arrangement, Parameters and Age panels the plant name is colored blue. That is to remind you that the changes you make there will apply to all the selected plants. For example, you can change the rotations, parameters, and ages of multiple plants at the same time. For the Posing, Stats and Note panels, however, there is no blue color because you can only look at and change one plant at a time on those panels.
Randomize parameters
Now let’s add a little variety.
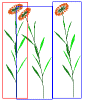
1. Still leaving all three plants selected, choose Randomize from the Plant menu. The three plants will change the way they look slightly. RandomizationODYQS5 changes some angles and branching patterns in the plant to produce what looks like some individual variation.
2. Randomize the plants a few more times, but use the keyboard shortcut (Control-R) this time. When you like how the plants look, stop.
Rotate
1. Still leaving all the plants selected, click the Rotate  cursor mode in the toolbar.
2. Now click and drag to the left or right in the drawing area. You will see your three plants rotating around in circles. This is called rotating in the X direction.
3. Click and drag up or down. The plants will rotate so you can look at them from a bird’s eye view or a worm’s eye view. This is called rotating in the Y direction.
[If the plants seem to go all over the place instead of what you see here, that’s okay – it means that the X rotations the plants already had are interacting with the Y rotations you’re adding to them. Rotations in different dimensions can interact in counter-intuitive ways. If you want to see a true bird’s-eye view, choose Reset Rotations from the Plant menu, then rotate in the Y direction. In practice you’ll find that you can get a feel for which way to rotate next.]

4. Now right-click or Shift-click and drag to the left or right. Your plants will tilt to the left or right. This is called rotating in the Z direction.
[As with Y rotation, if you see crazy rotations, choose Reset Rotations from the Plant menu, then rotate.]

5. Let’s put things back to normal. Select the Arrangement panel, then click Reset Rotations. The plants will all change to zero degrees in the X, Y and Z directions, as you can see in the rotation boxes in the Rotation panel. In doing this, we lost the random X rotations that randomization produced, so you can randomize the plants again in if you like.
Drag
1. Go back to Select/drag  mode.
mode.
2. Now click on any of the three plants and drag it; all the plants should follow along.
[If you deselect the plants by mistake, just click and drag a box around them to select them again.]
Resize
1. Now notice that the focused plant has something different on its selection rectangle – a little box in the upper right-hand corner. That box is called a resizing square1OTL.9O. Click there now and drag up or down to resize all the selected plants.

2. It might take a little while for all the plants to redraw. Depending on the speed of your computer and the complexity of your plants, you might want to often switch to drawing as bounding boxes only (choose Draw as Bounding Boxes from the Options menu) before you resize plants.
3. You can also resize plants by holding down the Control and Shift keys and pressing the arrow keys on the keyboard, or by clicking the little up and down arrows next to the number labeled Size on the Arrangement panel. Go ahead and try either of these now.
Undo and redo
Let’s check out the undo system.
1. Choose Undo/Redo List from the Edit menu. In the window that appears, you can see all the changes we’ve been making.
2. Choose a few changes from the top of the Things you can Undo list, then click Undo. A message will appear asking you to wait, and the changes will be undone.
3. Before you click on anything, choose Undo/Redo List from the Edit menu again. In the Things you can Redo list, select the actions you just undid, then click Redo. The changes will be redone, and you’ll be back to where you were.
4. Why did we get so upset about clicking on anything? Because if you undo some actions, then take some NEW actions, your undone actions will be cleared out from the undo list, and you won’t be able to redo them again. This can be confusing, so you might want to come back and try it out more later.
Save your file
Now save your plant file to use in the next lesson. Choose Save as from the File menu, choose a directory, and type in My tutorial – Editing and viewing plants.pla.
Move on to Changing plant parameters3MLEKN>main
Go to the Tutorial IndexTutorial>main
Read more about:
Navigating in the main windowNavigating_in_the_main_window>main
Zooming, scrolling and rotatingZooming/scrolling/rotating>main
Selecting plantsSelecting_plants>main
Moving and arranging plantsMoving_and_arranging_plants>main
Randomizing plantsRandomizing_plants>main
Undoing and redoingUndoing_and_redoing>main
Created with the Personal Edition of HelpNDoc: Free help authoring environment