Tutorial Lesson: Breeding new varieties
In this lesson you will create some new plant varieties using the breeder. The breeder is a tool you can use to create new and interesting plants by “evolving” parent plants into successive generations1VHOC04 of offspring. The breeder works by randomly changing plant parameters to “mutate” plants.
Open the file from any lesson
This tutorial lesson doesn’t have to be done after the previous lesson, so you can open any of the tutorial files you have saved. If you haven’t done any tutorial lessons, open the file called Tutorial Lesson – Making a Plant.pla in your PlantStudio directory.
Breed the first generation
1. Select the plant called Black-eyed Susan.
2. Choose Breed from the Plant menu. The breeder will appear with your plant and a generation of new plants.
[If all the plants created look just like the plant you bred, click the Vary numbers low  button and double-click on the plant where it sits all by itself at the top of the breeder. Its offspring will be replaced by ones with some variation.]
Breed a few more generations
1. Looking at the generation of offspring you have produced, pick the one you like best and double-click on it. If you don’t like any of them, double-click on the parent plant all by itself in the first row.
[If the breeder wasn’t empty when you started this lesson, there will already be some generations in the breeder. Just ignore them.]
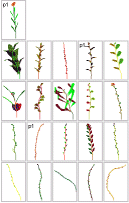
2. Move through the breeder double-clicking on a plant in each generation. If you don’t like any of the plants in a generation, double-click on a plant in the previous generation to get different plants. Choose something you want to select for – say you want a tall skinny plant (like the example here), or a plant with lots of flowers, or a very short plant – and in each generation choose the plant that best meets your selection criterion.
Keep a breeder plant
When you find a plant you like enough to keep, stop breeding. It’s important to understand that none of the breeder plants are stored after you close PlantStudio, so you need to move a plant out of the breeder to make it permanent.
1. While we’re at it, let’s try out a trick that makes it easier to get a closer look at newly bred plants as you make them. First, go to the main window and set it up so that you can only see one plant at a time.
[Click the Show only focused plant  button or choose View What Plants > One Plant at a Time from the Options menu.]
2. Next, place the drawing area on the left side of the main window.
[Click the Drawing area on side  button or choose Place Drawing Area > On Left Side from the Options menu.]
3. Place the breeder on top of the main window so that the left side of the main window is still showing, like this:
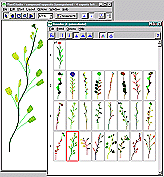
4. Now go to the plant you want to keep, click on it to select it, then right-click and choose Send Copy to Main Window from the popup menu that appears. The plant will appear in the main window, nice and big.
5. Now (if you like) you can rotate, resize and randomize the plant, change its parameters, and save it in your file.
Change some breeding options
When you were breeding the plant in the steps above, you were using whatever breeding options were set already. Now let’s look more closely at the breeding options.
1. Go back to your original plant in the breeder (at the top of the window, probably) and click on it to select it.
2. Let’s look at the breeder toolbar.
• The Breed button  is just another way to breed the selected plant.
• The second set of buttons shows how much variation the breeder will use in changing numerical parameters, like stem length and leaf size. The buttons go from Vary numbers none  to Vary numbers high
  , followed by Vary numbers custom
  . If you click the Vary numbers custom button, you can specify how much variation to apply to each group of parameters (but that’s an advanced topicZIECV3).
• The third set of buttons is where you can turn on or off color and 3D object variation. If the Vary colors button  is pushed in, the colors in the plants will vary during breeding. If the Vary 3D objects button
  is pushed in, the leaves and flowers and so on will vary when you breed plants.
3. Now that we’ve seen the breeder toolbar, let’s change the breeding options. First turn off all the breeding options: numbers, colors and 3D objects. The toolbar should look like this:

4. The last two buttons should be “up” or not pushed in. You might have to click on them. Now double-click on your original plant. You should get a row of identical children, because you’ve asked the breeder to create children with no variation at all. There’s really no reason to do this, except to see that you can choose what you want to vary.
5. Now let’s look at colors alone. Click the Vary colors button to push it in, then double-click on your original plant again. You should get a row of plants that look just like your original plant but have all sorts of strange colors.
6. Let’s look at 3D objects alone. Click the Vary colors button again to turn it off, then click the Vary 3D objects button , then breed your original plant again. You should see a row of plants with the same shape and colors as your original plant, but with all sorts of different leaves and flower petals.
7. Now you can see how you can use the three types of variation (numbers, colors, 3D objects) separately or together to get whatever breeding output you want. Let’s try it all together. Turn on color and 3D object variation, and choose medium numerical variation, then breed again. Now you should have some seriously varying plants.
8. When you get a plant you like, turn off numerical variation and just change the 3D objects or colors, and fine-tune the plant.
Move on to PosingGMNFR
Go to the Tutorial IndexTutorial>main
Read more about:
Using the breederZIECV3>main
Created with the Personal Edition of HelpNDoc: Easily create PDF Help documents