Tutorial Lesson: Changing a 3D object
In this lesson you’ll copy an existing 3D object and change it to make a flower look more full. Working with 3D objects is one of the more complicated tasks in using PlantStudio, so you should probably do this lesson after you’ve done most of the other tutorial lessons or have used PlantStudio for a little while.
Open a file to work with
This tutorial lesson doesn’t have to be done after the previous lesson, so you can open any of the tutorial files you have saved. If you haven’t done any tutorial lessons, open the file called Tutorial Lesson – Changing Parameters.pla in your PlantStudio directory.
Get ready to look at one plant
1. Select the plant Black-eyed Susan.
2. Go up to the toolbar and click on the Drawing area on side  button, then on the Show only focused plant
  button. Your plant will appear large and on the left side.
Find the flower petal parameter
1. Click on the Parameters tab in the focus panel and choose the Primary flowers parameter section from the drop-down list.
2. In the list of primary flower parameters, find the parameter named Flower petal 3D object and open it. Click on the picture of the petal 3D object there.
3. The 3D object chooser window will appear with all the 3D objects available. What we’re going to do is copy the current 3D object and change the copy. You’ll find that you will rarely want to make a completely new 3D object, because there will usually be one you can change to suit your needs.
Make a new copy and prepare to change it
Make sure the “Tutorial petal” 3D object is still selected, then click Copy. In the window that appears asking for a name for the new 3D object, type “Black-eyed Susan petal” and click OK. Your new copy will appear at the bottom of the list of 3D objects. Now without clicking off the new copy, click Edit.
Look at the 3D object and rotate it
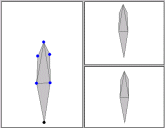
1. After you click Edit, the 3D object editor will appear with your new petal in it. The drawing space on the left is where we’ll edit the petal.
2. Before we start adding to the 3D object, let’s see how it looks in three dimensions. Look at the drawing areas on the right side of the window. There is no particular reason to have two of these, except that you can rotate the 3D object and see it from two directions at once.
3. Click Scale to Fit to make the 3D object bigger, then click on the Rotate mode  button, move over to one of the rotation drawing areas, and click and drag. This works the same way as in the main window:
• drag left and right to rotate in the X direction
• drag up and down to rotate in the Y direction
• right-click or Shift-click and drag left and right to rotate in the Z direction
Look at the points and drag them around
1. Now we will be concentrating on the left-side drawing area, where we will change the 3D object. Make the editor window bigger so you can see better what you are doing, then click on the Scale to Fit button again to get the petal centered in the drawing area.
2. We want to leave some space above the petal so we can add to it. Click on the Magnify mode  button and right-click or Shift-click twice to shrink the petal down.
3. Click the Scroll mode  button and move the petal into the bottom center of the left drawing space.
4. Okay. Do you see those large blue dots on the petal in the left-side drawing area? Those are the points of the 3D object. A 3D object is very simple: it’s just made up of points joined into triangles.
[If the blue points are very small, you should enlarge them to do the tutorial – it’s easier. Increase the number at the bottom of the 3D editor labeled Point size to something like 8 or 10.]
5. Let’s try moving some points now to see how they are connected. Click the Drag mode  button on the toolbar at the top of the window. Now move the cursor over the blue points. As you move over each point, it will turn red, like this:

6. Now click on a point and drag it. The triangle attached to it will follow along, like this:

7. Let go of the point. We didn’t really want to drag that right now, so let’s undo it. Click the Undo drag button. Note that the Undo button changes what it says depending on what you just did. You can do multiple undos here in almost the same way as the main PlantStudio undo system. The only difference is that selecting, rotating and scrolling are NOT undoable here.
Add one triangle
1. Okay, we’ve seen how to drag points, and we’ll use that again later. But right now we want to make our petal larger and more complicated, so our Black-eyed Susan plant has a fuller flower.
2. Switch to Add triangles mode  and go back to holding your cursor over points in the petal. They will still light up in red.
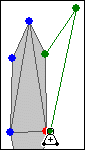
3. Click on the point that is next to the top of the petal on the right side (the point shown in red in the pictures above). After you’ve clicked on the point, it will turn green, and a green line will follow the cursor as you move it around, like this:
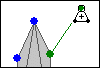
4. Now move the cursor out in space to the upper right of the point on the petal, and click. The same thing will happen again: a second green point will appear, and a line will follow your cursor from it.
5. Now bring your cursor back to the point already on the petal below the first point. It will turn red when you go over it.
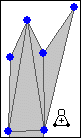
6. Click there, and you’ll complete your first added triangle. It should look like this:
Add more triangles
Now that you know how to make a triangle, you can add more to increase the size and complexity of the petal. Switch back and forth between Add triangles mode and Drag mode to move points around as you go.

• If you make a triangle that you don’t like, switch to Remove triangles mode  and click on it to remove it. Remember that you can undo multiple times.
• If you are in the middle of making a triangle and you realize it’s a bad one, finish it anyway, then click Undo add.
• If you make a triangle that seems the wrong color, switch to Flip triangles mode  and click on it. Triangles that are flipped the wrong way will draw in the wrong color (back-face instead of front-face color) on the plant. If you always make your triangles in clockwise direction, you’ll never have to flip triangles. But it’s not a big deal to flip them, either.
• Don’t worry about making too many triangles or making the 3D object perfect. Just play around until you have something you like.
Drag points in the Z direction
1. Okay, now you’ve got a more complicated petal. Before we finish and see this on the plant, let’s check how it looks in three dimensions.
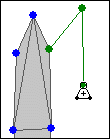
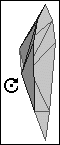
2. Click on the Rotate mode button, move over to one of the rotation drawing areas, and click and drag as you did earlier. Check that your petal looks good in 3D. It should look something like this:
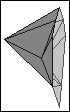
3. If you like, you can drag some points in the Z direction to change how the petal looks in 3D. Go to the left side drawing area (with the big blue dots), choose Drag mode , and right-click or Shift-click and drag on points. You won’t see anything happen in the left side of the window, so don’t be alarmed. That can be a little confusing. However, you should see something happening in the right side, where you can see your plant in 3D. Here’s an example where we dragged one of the points way out in the Z direction.
Finish up
1. When you’re finally satisfied with your petal 3D object, click OK to close the editor. You’ll see your new petal in the 3D object chooser window.
2. To see your new petal on the plant, click OK.
[You can also do this by clicking Apply, then Cancel. If you do that, a window will pop up asking if you want to save your changes to the 3D object library. Click Yes.]
3. You might want to change the scale of the 3D object on the flower, or the number of petals, or the X, Y and Z rotations to make it look even better.

Save your file
If you want to keep your posed plant, save the plant file. Choose Save as from the File menu, choose a directory, and type in My tutorial – Changing a 3D object.pla. You can also look at the file Tutorial Lesson – Changing a 3D Object.pla to see what the end result of the lesson is like.
Go to the Tutorial IndexTutorial>main
Read more about:
Editing 3D objectsEditing_3D_objects
Created with the Personal Edition of HelpNDoc: Full-featured Kindle eBooks generator